First camera ever · fact-checked against Fujifilm's official manual · 2026
Fujifilm X100VI, from absolute zero.
Never used a real camera before? This is everything, dumbed down: what to do out of the box, what every dial does, how to hold it, easy angles that always work, and which film simulation to pick for any occasion — festivals, food, street, night.
1 · Your first 30 minutes (out of the box)
Verified against the official Fujifilm X100VI manual.
- Charge the battery in the camera. Put the NP-W126S battery in (contacts first, arrow toward the lens side), plug the supplied USB-C cable into the camera and a USB power source, and make sure the camera is OFF — it will not charge while switched on. Indicator lamp: on = charging · off = done · blinking = error. A full charge takes ~5 hours at 5 V/500 mA (a phone-style USB-C PD brick is fine). Fujifilm doesn't include a wall plug; the external BC-W126S charger is sold separately — a cheap dual charger for spare batteries is the comfortable upgrade.
- Insert your SD card (bottom door, next to the battery) and format it in-camera: MENU → the wrench (SET UP) → format. Do this once before your first shoot.
- Power on and follow the language / date-time prompts.
- Update the firmware (worth it — Fujifilm ships fixes and features): check your version by powering on while holding DISP/BACK (card must be inserted). Then on a computer, download the update from Fujifilm's X100VI support page — the file must be named exactly FPUPDATE.DAT (if your browser saved "FPUPDATE (1).DAT", rename it) — copy it to the root of the SD card (not inside DCIM), reinsert, and run the update. Battery must be full, and never power off mid-update. Takes ~1–2 minutes. (Alternative: the FUJIFILM XApp on your phone can push updates too.)
- Take a photo of your shoe. Seriously — confirm it shoots, then go read section 2.
2 · Every dial, dumbed down
The X100VI looks intimidating because the controls are physical dials instead of menus. That's actually the easy part — each dial does exactly one thing, and every dial has an "A" position that means "camera decides."


The official parts diagram — every button, dial & port labeled (front/top + back/ports), straight from the manual. Tap an image to open it full-size in the reader (p.30–31). Reminder: every dial's “A” = automatic → a very fancy point-and-shoot.
| Control | Plain English | Beginner move |
|---|---|---|
| Aperture ring (lens) | How much background blur. Low number (f/2) = blurry background; high (f/8) = everything sharp. | Leave on A |
| Shutter speed dial | Freezes or blurs motion. 1/500 freezes a runner; slow speeds blur. | Leave on A |
| ISO ring (lift outer ring of the shutter dial & turn) | Light sensitivity. Higher = brighter in the dark but grainier. | Set to A (Auto-ISO) |
| Exposure comp. dial | The "brighter/darker, please" knob. The one dial you SHOULD touch on day one. | ±0, nudge as needed |
| Focus switch (LEFT side of body: MF / AF-S / AF-C) | MF = you focus (don't). AF-S = focus once (still subjects). AF-C = keeps refocusing (moving subjects). | AF-S daily · AF-C for moving kids/pets |
| Front lever (OVF ↔ EVF) | Optical = a window (you see outside the frame — great for street). Electronic = exactly what the sensor sees, including your film simulation. | EVF while learning — what you see is what you get |
| Q button | Quick menu — one screen with your most-used settings (film sim, ND filter, etc.). | This is where you change film sims fast |
All 47 parts explained — every button, dial & port (how you use each)
Numbers match the official diagram above (manual p.30–31).
Front & top
| # | Part | How you use it |
|---|---|---|
| 1 | Fn1 button | Customizable shortcut on top — assign a favorite function (ND filter, film sim…) and press to trigger it. |
| 2 | Exposure compensation dial | The brighter/darker knob. Photo too dark? turn to +1. Too bright? −1. Your most-used dial. |
| 3 | Shutter button | Press halfway to focus, fully to take the shot. Threaded for a mechanical cable release. |
| 4 | ON/OFF switch | The collar around the shutter button — flick to power on/off. |
| 5 | Shutter speed / ISO dial | Turn = shutter speed (freeze vs blur). Lift the outer ring & turn = ISO. Leave both on A to start. |
| 6 | AF-assist / Self-timer lamp | Little lamp that helps autofocus in the dark and blinks during the self-timer countdown. |
| 7 | Hot shoe | Top slot for an external flash or accessory (mic adapter, etc.). |
| 8 | Microphone | Records audio for video — don't cover it while filming. |
| 9 | Flash | Built-in flash for fill light in dim scenes. |
| 10 | Viewfinder window (front) | The front window of the hybrid optical/electronic viewfinder. |
| 11 | Strap eyelet | Where you attach the neck or wrist strap. |
| 12 | Focus mode selector | Left-side switch: MF / AF-S (single) / AF-C (continuous). Use AF-S normally. |
| 13 | Aperture ring | Lens ring — sets background blur (f/2 blurry → f/16 sharp). “A” = auto. |
| 14 | Control ring / Focus ring | The lens ring: in autofocus it's a customizable control (e.g. digital zoom); in manual focus it focuses. |
| 15 | Front ring (detachable) | Unscrews to fit the adapter ring for filters / lens hood (and weather sealing). |
| 16 | Lens | The fixed 23mm f/2 lens (35mm-equivalent). |
| 17 | Fn2 button | A second customizable function button (on the front). |
| 18 | Viewfinder selector (front lever) | Flick to switch optical (OVF) ↔ electronic (EVF) viewfinder. |
| 19 | Front command dial | Finger dial — scrolls settings; press to switch what it controls. |
| 20 | Hot shoe cover | Protects the hot shoe when no flash is attached. |
| 21 | Lens cap | Snaps on to protect the lens when not shooting. |
Back & ports
| # | Part | How you use it |
|---|---|---|
| 22 | Diopter adjustment | Little dial by the viewfinder — turn until the viewfinder display looks sharp to your eyes. |
| 23 | Viewfinder eyepiece | Where your eye goes — the rear of the hybrid viewfinder. |
| 24 | Eye sensor | Detects your eye and auto-switches between viewfinder and rear screen. |
| 25 | DRIVE/DELETE button | Pick drive mode (single, burst, bracket, Movie); in playback, deletes photos. |
| 26 | AEL/AFL button | Locks exposure and/or focus so you can recompose. Customizable. |
| 27 | Rear command dial | Thumb dial — scrolls/zooms; press to check focus or switch functions. |
| 28 | Indicator lamp | Status light (writing to card, charging, self-timer). |
| 29 | Q (quick menu) button | Opens the quick menu — fast access to film sim, ND filter & 16 key settings on one screen. |
| 30 | Connector cover | Rubber flap covering the side ports (USB, HDMI, mic). |
| 31 | Cable channel cover | Small cover for routing a DC-coupler power cable. |
| 32 | Battery-chamber cover | Bottom door to the battery + SD card. |
| 33 | Battery cover latch | Slide to open the battery door. |
| 34 | PLAY button | Reviews your photos and videos. |
| 35 | DISP/BACK button | Cycles the info shown on screen; “back/cancel” in menus. Long-press = Bluetooth pairing. |
| 36 | MENU/OK button | Opens the main menu; confirms selections. |
| 37 | Focus stick (focus lever) | The little joystick — flick it to move the focus point around the frame. Super useful. |
| 38 | Tripod mount | Standard 1/4"-20 socket on the bottom for tripods / grips. |
| 39 | Speaker | Plays back movie / audio sound. |
| 40 | LCD / touch screen | Rear screen — tap to focus/shoot, swipe photos, tap menu items. |
| 41 | Mic / remote connector | 2.5mm jack for an external mic or a remote shutter release. |
| 42 | USB-C connector | Charging, file transfer, webcam, and firmware updates. |
| 43 | HDMI Micro (Type D) | Outputs video to an external monitor / recorder. |
| 44 | Battery latch | Holds the battery in — flick to release it. |
| 45 | Battery chamber | Where the NP-W126S battery sits. |
| 46 | Memory card slot | Where the SD card goes (next to the battery). |
| 47 | Serial number plate | The camera's serial number (registration / warranty). |
3 · How to hold it (steadier = sharper)
Blurry photos are usually shaky hands, not a bad camera. Three contact points beat two.
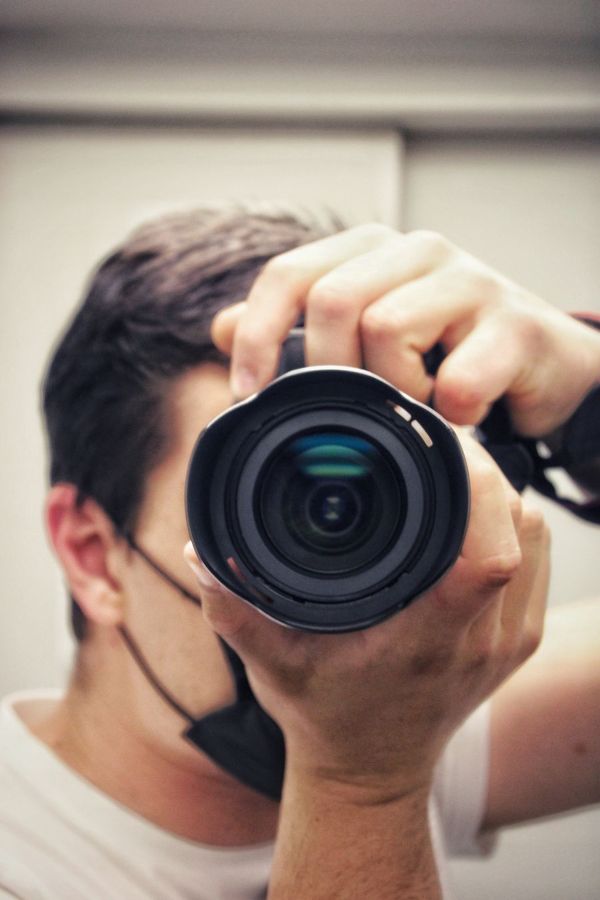
✓ GOOD — camera pressed to your eye, left palm cradling UNDER the lens, elbows tucked into your ribs. Three contact points = a human tripod.
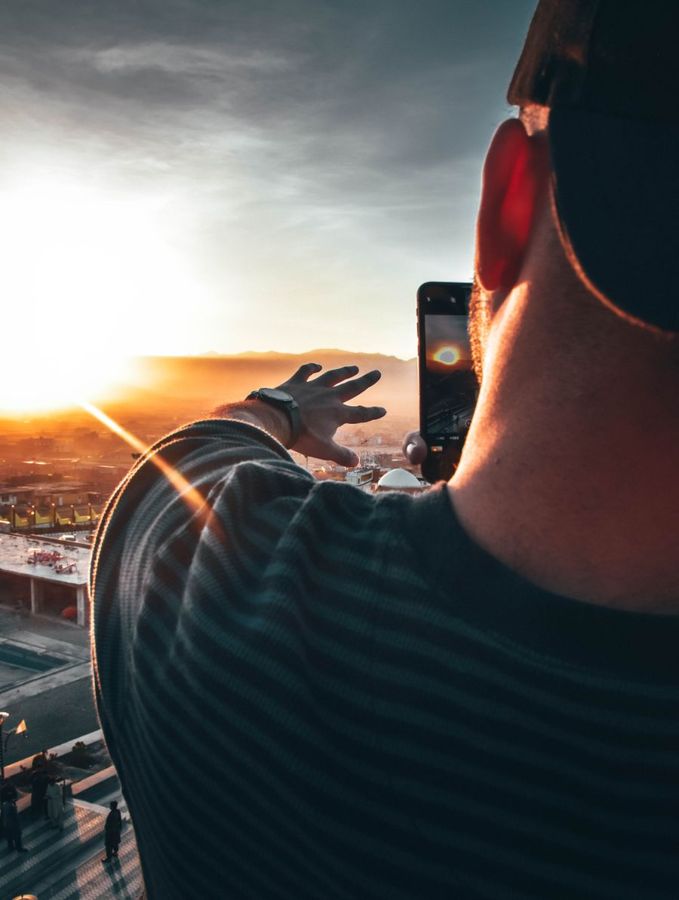
✗ SHAKY — arms extended, phone-style. No third contact point, so every heartbeat and breath turns into blur.
- Right hand wraps the grip, index finger resting on the shutter. Left palm cradles under the lens/body — never pinch from the top.
- Elbows against your ribs, feet shoulder-width, lean slightly forward. Exhale, then press the shutter gently (don't stab it).
- Use the viewfinder — pressing the camera to your brow adds a third contact point and is much steadier than composing on the rear screen at arm's length.
- Low light: lean your shoulder on a wall or pole, or plant elbows on a table. The X100VI's 6-stop stabilization (IBIS) is genuinely great, but it can't fix a flailing stance.
- Street carry: wrist strap, camera in hand, powered on — moments don't wait for a bag zipper.
4 · Universal easy angles (they always work)
Ten moves that instantly beat "stand there and click." Every example is a real photo — study where the photographer stood, then steal it. First, turn on the grid: MENU → screen-setup → framing guideline 3×3.
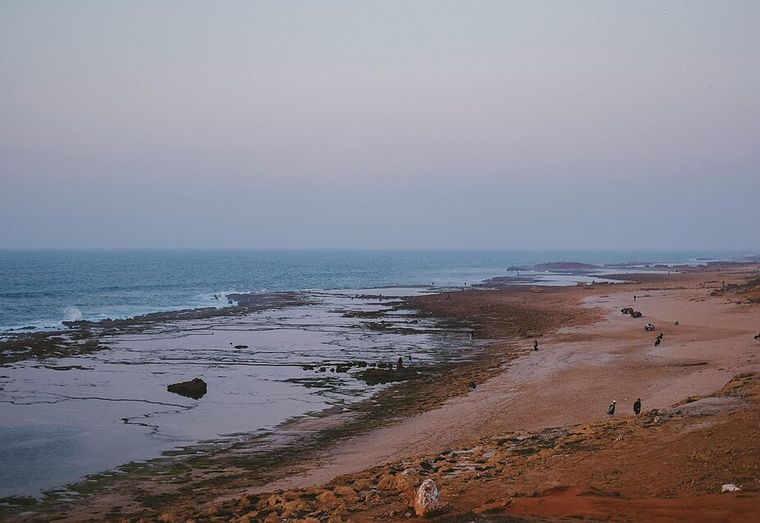
1 · RULE OF THIRDS
The one framing rule that upgrades everything. Imagine the 3×3 grid (or just turn it on) and put the important stuff on the lines, not in the middle.
- Horizon on the top or bottom line, never through the middle — here it's on the top third, so the beach gets the space.
- Subject on a vertical line or a crossing point — the surf line and the walkers sit on the right third.
- X100VI: with Face/Eye AF on, the camera keeps focus wherever on the grid you place a person.
Photo: Bonosag3 · CC0

2 · LOW ANGLE (THE HERO SHOT)
Crouch and tilt up. Buildings, statues, festival stages, friends — everything gains drama when the sky becomes the background.
- Drop to knee height and tilt up until the top of the subject has clean sky around it, like this dome.
- For people: full-body shots only — from below, a face is all chin. Keep the camera at their chest height or lower, feet near the bottom edge.
- X100VI: tilt the LCD screen out and up — you can shoot from your knees without lying on the sidewalk.
Photo: Radomianin · Public domain
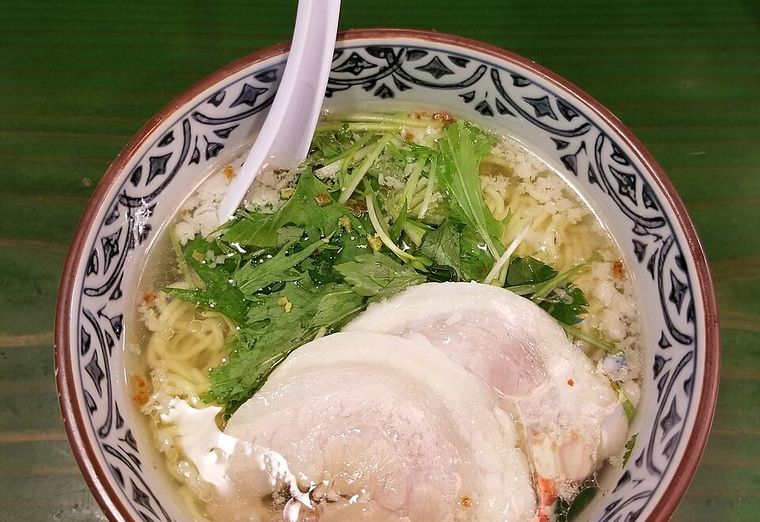
3 · 45° FOOD ANGLE
The default plate shot — it's how a hungry diner sees the food, so it reads as appetizing automatically.
- Stay seated, lean slightly over the table — your eye ends up at roughly 45° to the plate.
- Chase window light from the side or behind the bowl (that's what makes broth glisten like this). Never overhead spotlights, never flash.
- X100VI: exposure comp dial to +⅓, Astia sim, and get closer than feels polite — it focuses down to ~10 cm.
Photo: Yuet Man Lee · CC BY-SA 4.0
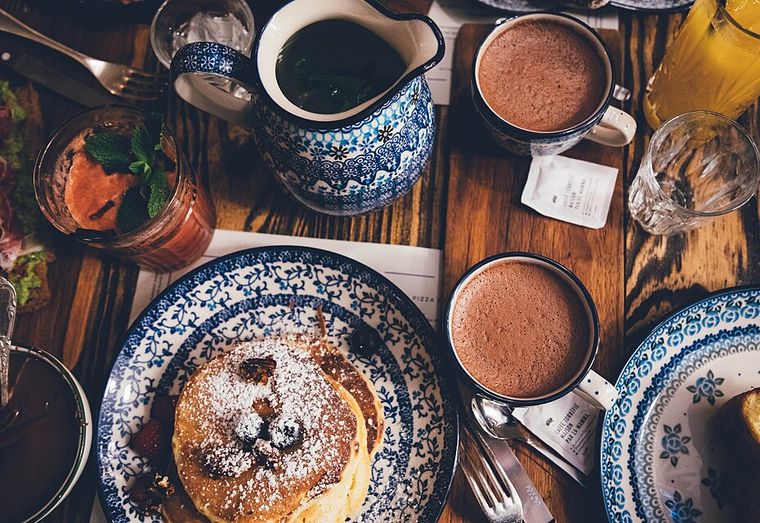
4 · OVERHEAD FLAT-LAY (90°)
Stand and shoot straight down — the whole-table spread. Brunch, ramen sets, anything with multiple dishes.
- Stand up, hold the camera flat over the table, elbows tucked so it doesn't wobble.
- Style it for 10 seconds first: nudge plates and cups into a loose grid, drop napkins/cutlery in the gaps, watch for your own shadow.
- X100VI: tilt the LCD out and check the grid — frame edges parallel to the table edge, or it looks accidental.
Photo: Anthony Delanoix · CC0
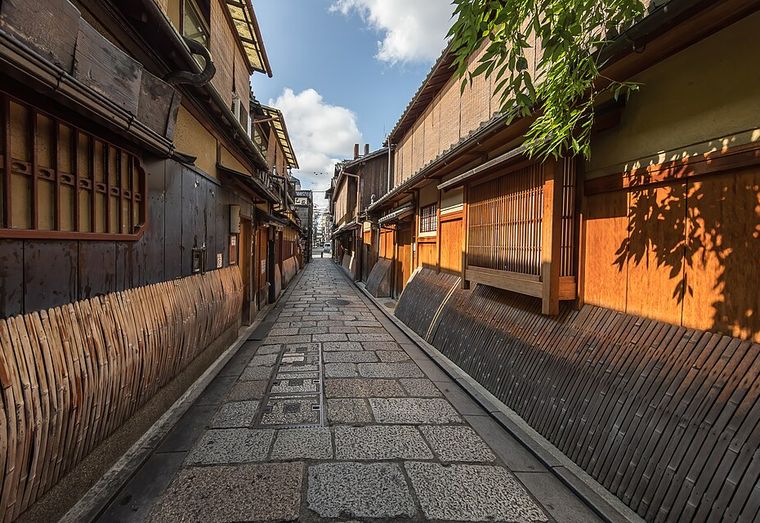
5 · LEADING LINES
Stand where a street, rail, hallway, or bridge rushes toward one point — the lines drag every viewer's eye exactly where you want it.
- Stand dead center of the path so both sides converge, like this Kyoto lane.
- Put something at the end of the lines — a person, a lantern, a sign. The lines are the arrow, not the subject. Wait for a walker to hit the spot.
- NYC is made of these: avenues, crosswalks, subway platforms, the Brooklyn Bridge cables.
Photo: Basile Morin · CC BY-SA 4.0

6 · FRAME IN FRAME
Shoot through something — an arch, doorway, window, subway entrance, a gap between people. Instant depth and focus.
- Find the frame first, then wait for the scene inside it — here the arch does all the composition work.
- Let the frame go dark. Expose for the scene inside; the shadowed border is the whole point.
- X100VI: single-point AF placed on the subject through the opening, so it doesn't grab focus on the frame itself.
Photo: Pseudopanax · Public domain
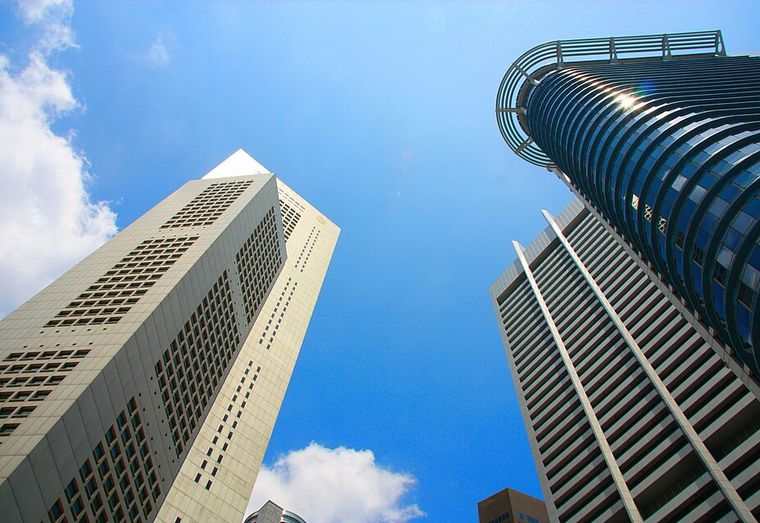
7 · LOOK STRAIGHT UP NEW
The skyscraper move. Stand at the base and aim 90° up — the verticals converge and even a boring office tower turns into geometry.
- Walk to the corner where 2–3 towers meet (like this) — one building is a snapshot, converging buildings are a photo.
- Rotate until the buildings slice in from the corners of the frame, with a pocket of clean sky in the middle.
- Also works on: tree canopies, station ceilings, fire escapes, atriums. X100VI: point it up at chest height and tilt the LCD toward you — no neck cramp.
Photo: Marek Ślusarczyk · CC BY 3.0
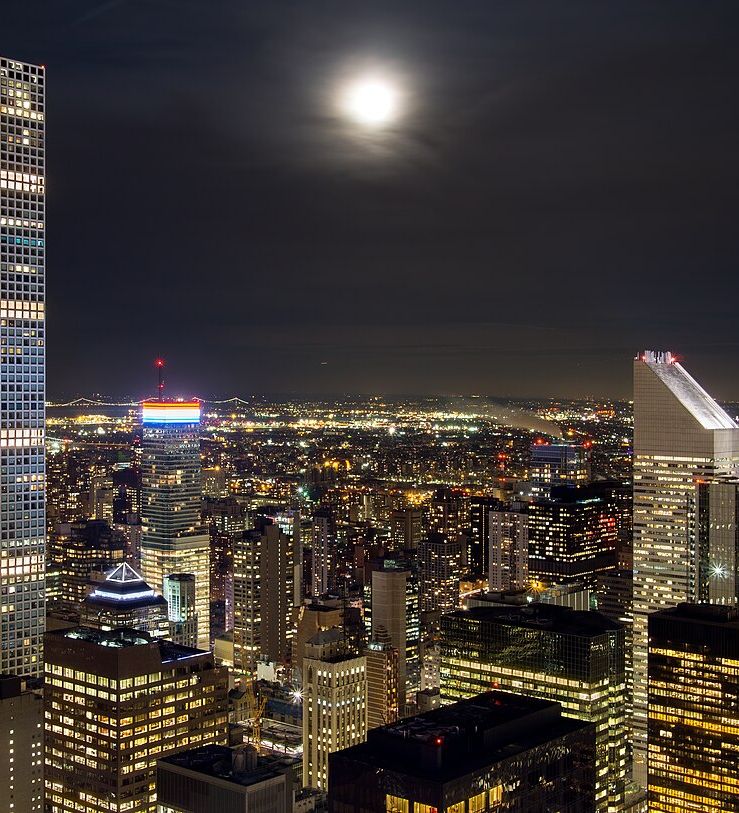
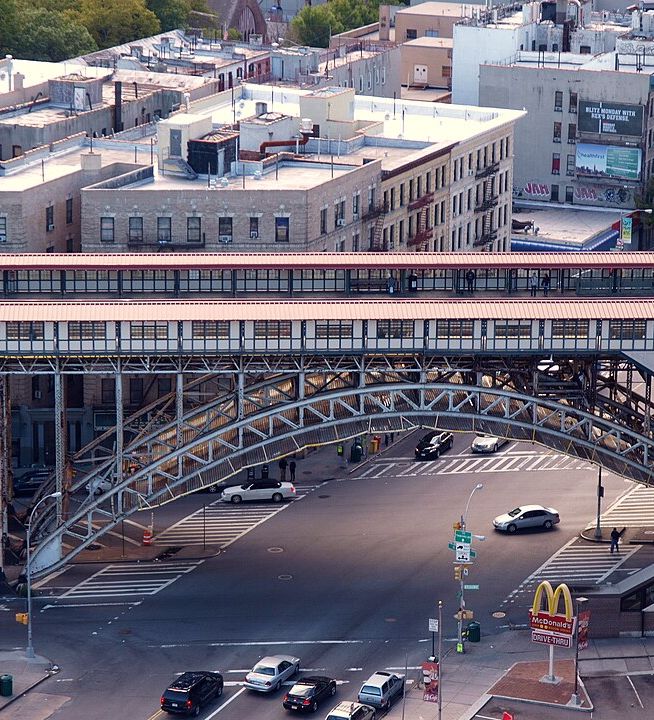
8 · SHOOT DOWN FROM UP HIGH NEW
The opposite skyscraper move: observation decks, rooftop bars, hotel windows, bridges, even a mall mezzanine. The city becomes geometry; people become dots.
- Two distances, two photos: far = skyline (left, shot from Top of the Rock); near = one intersection turns into shapes and stories (right).
- Through observation-deck glass: put the lens right against the glass and cup your hand around it — that kills the reflections.
- X100VI: the ~6-stop IBIS makes handheld dusk shots like the left one realistic — still brace your elbows on the railing.
L: Rhododendrites · CC BY-SA 4.0 · R: tomislav medak · CC BY 2.0
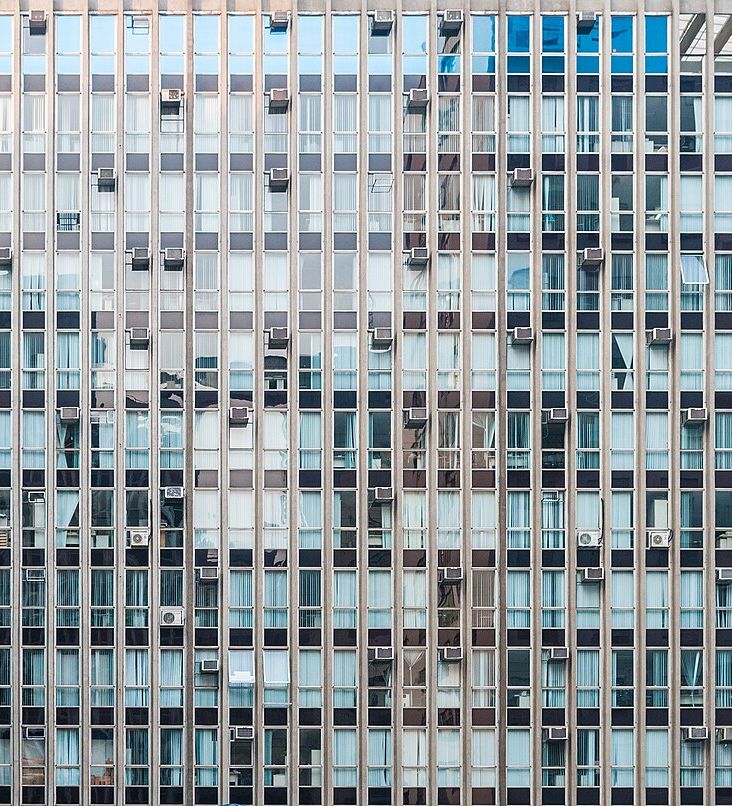
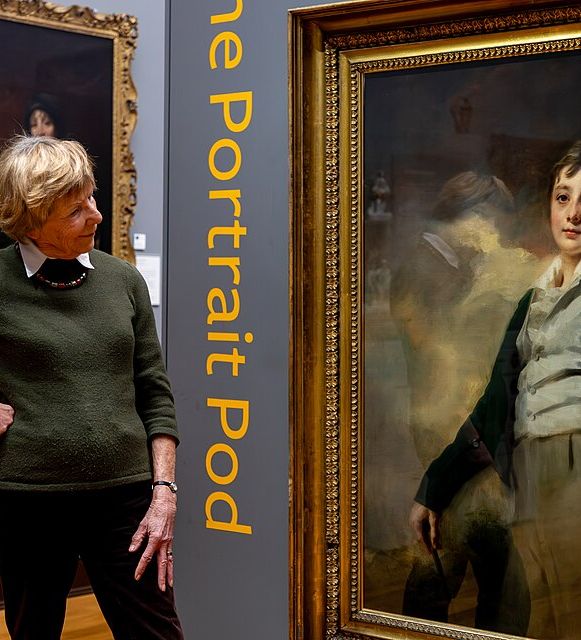
9 · SQUARE-UP (DEAD-ON FLAT) NEW
Stand perfectly square to a flat surface — a facade, mural, painted door, or painting — so it fills the frame with zero tilt. Instant Wes Anderson.
- Feet parallel to the wall, camera level (not tilted up), back up until it fills the frame — window grids become wallpaper patterns (left).
- In museums: stand centered on the painting, no flash, and let a visitor into the frame for scale and story (right).
- X100VI: this is what the grid is for — lay the gridlines along window rows or the picture frame. One degree of tilt is the difference between "snapshot" and "print."
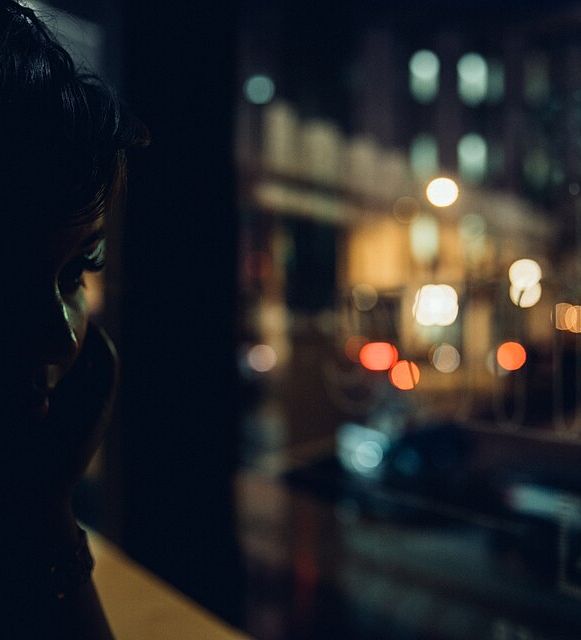
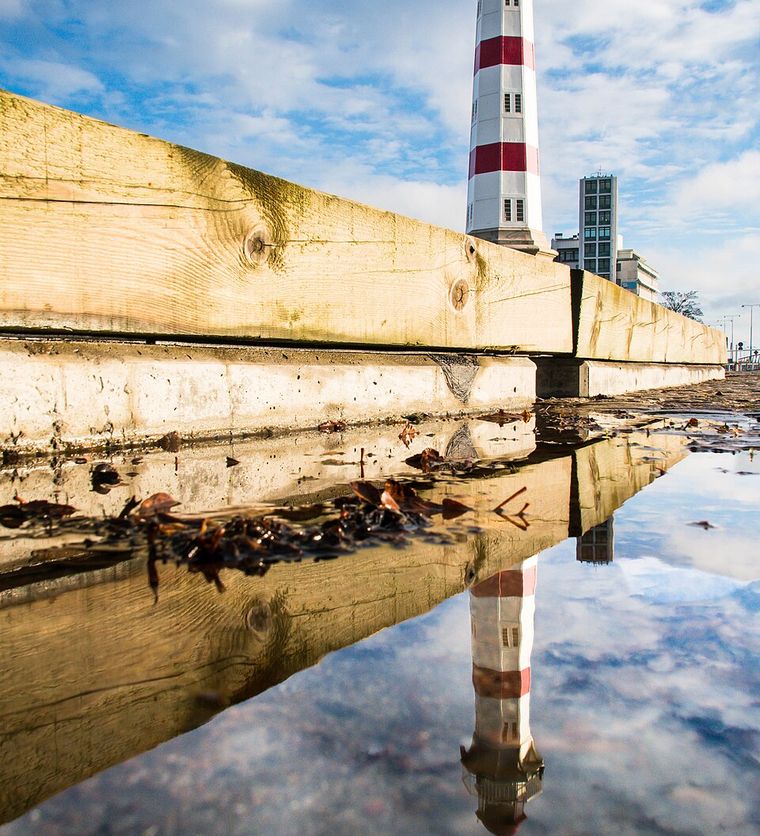
10 · WINDOWS, GLASS & PUDDLES NEW
Glass is a free filter. Café windows turn people into silhouettes with neon bokeh; after rain, every puddle is a mirror lying on the ground.
- Café window: put your subject against the bright outside and expose for the lights — the face going dark is the mood (left).
- Puddle: get the camera almost touching the water and tilt until the whole reflection appears (right). Bonus: flip the shot upside down later.
- X100VI: decide what the photo is of — the reflection or the thing — and put single-point AF on it; autofocus guessing wrong is the #1 fail here. The tilting LCD saves you from lying in the puddle.
🕺 Posing for men — look your most attractive
Section 4 was where the camera stands. This is what you do — the poses that read as confident and photograph well on men. Every example is a real photo (free-license). Steal the body angle, the hands, and where the eyes go.
- Never square-on and stiff. Angle your torso ~30–45° and shift your weight onto your back foot — straight-and-symmetrical reads as a mugshot.
- Create gaps. Keep a little space between your arms/hands and your body so you don't look like one solid block.
- Define the jaw. Push your forehead slightly toward the camera and drop the chin a hair ("lead with the forehead"). Kills the double-chin, sharpens the jawline.
- Give your hands a job. Pockets (thumbs out, never white-knuckle fists), a jacket, a railing, adjusting a cuff. Idle hands are what make guys look awkward.
- Eyes: off-camera = candid, into the lens = powerful. Either way add a tiny squint (a "squinch") so your eyes look intentional, not blank.
- A real smile beats a posed one. Actually think of something funny, or exhale a laugh right before the click.
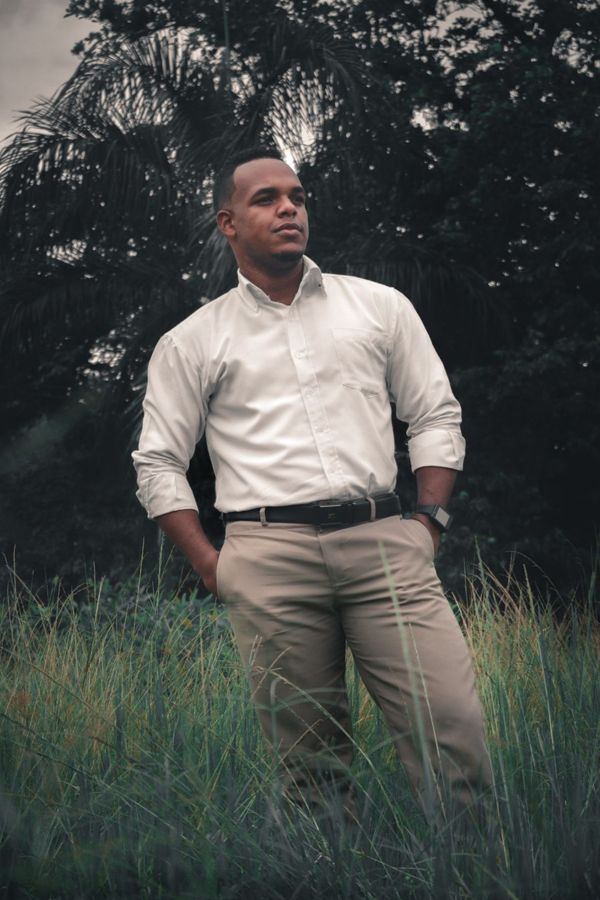
1 · HANDS IN POCKETS (your default)
The safest confident pose there is. If you don't know what to do — do this.
- Hook your thumbs out of the pockets (or tuck hands fully in) — never a jammed fist. Keep it loose.
- Weight on your back foot, front foot a step forward and turned slightly out. Instantly relaxed, not stiff.
- Roll your shoulders back and down, chin slightly forward. Look just off the lens.
Photo: Pexels · free license
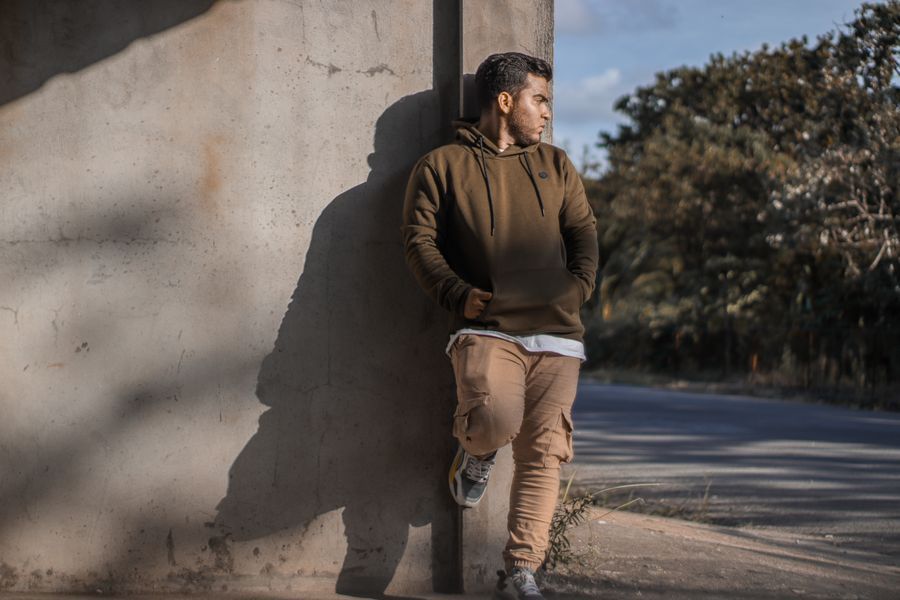
2 · LEAN ON A WALL
Leaning reads as "I'm comfortable here." It also gives your body an angle instead of a straight line.
- Lean a shoulder or your upper back — not your whole slumped body. Stay tall.
- Cross one foot over the other, or plant a sole flat on the wall behind you.
- Hands in pockets, glance away for candid or into the lens for intensity.
Photo: Pexels · free license
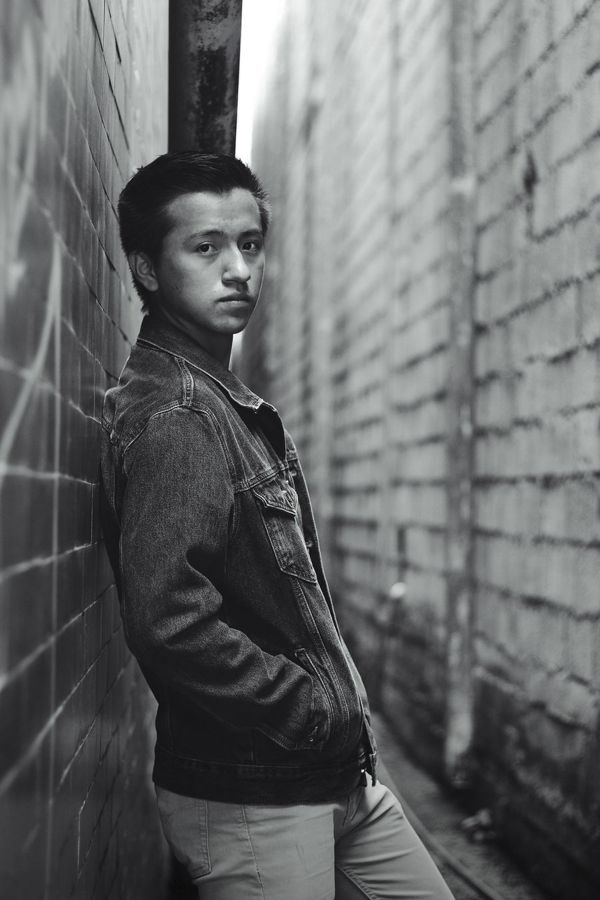
3 · OVER-THE-SHOULDER (the jawline shot)
The single most flattering head position for a man — it stretches and defines the jaw and neck.
- Turn your body ~90° away from the camera, then rotate only your head back toward it.
- Push your forehead toward the lens and drop the chin a touch. Feel your neck lengthen.
- Looks especially strong in high-contrast or black & white (X100VI: try the ACROS film sim).
Photo: Pexels · free license
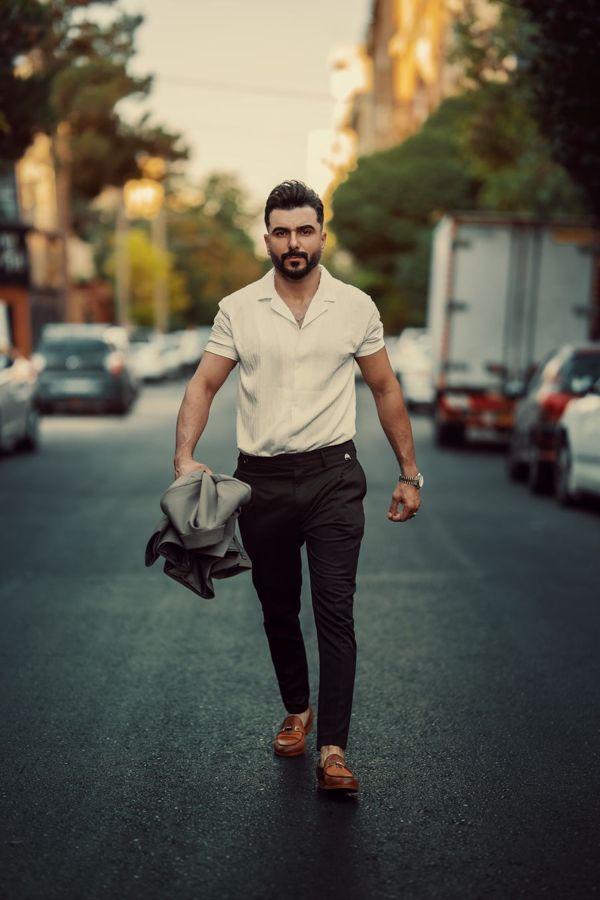
4 · WALK TOWARD THE CAMERA
Movement kills stiffness. A walking shot looks powerful and effortlessly candid.
- Actually walk — take real steps toward the lens, arms swinging naturally. Don't freeze.
- Look slightly off-axis (not dead into the lens) for a softer, cooler read. One hand can hold a jacket.
- X100VI: set focus to AF-C (continuous) and hold the shutter for a burst — you'll get one with a clean stride and expression.
Photo: Pexels · free license
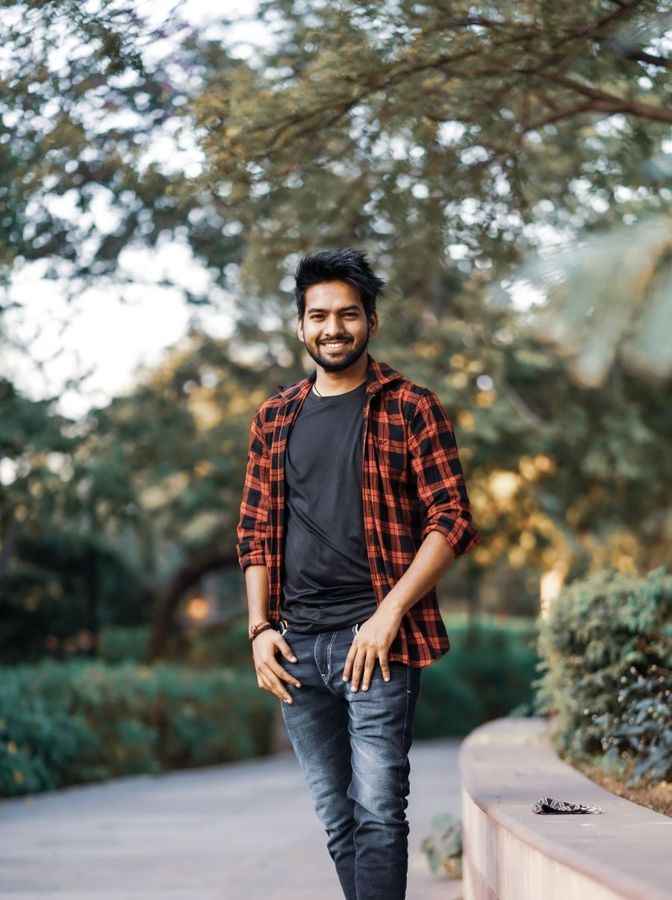
5 · THREE-QUARTER TURN + EASY SMILE
Turning off-square slims you and adds shape. A genuine smile does the rest.
- Angle your torso 30–45° to the camera, leading shoulder slightly back. Never chest-on.
- Keep your weight on the back leg; let the front knee bend a little.
- For the smile, think of something that actually makes you laugh — a real one crinkles the eyes; a posed one doesn't.
Photo: Pexels · free license
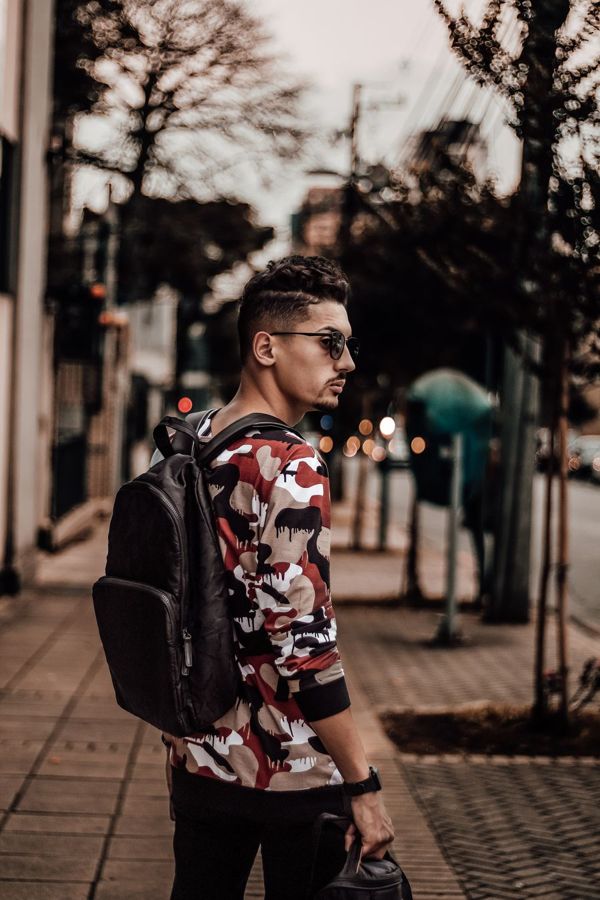
6 · LOOK AWAY (the "plandid")
Eyes off camera = instant natural. A planned pose that reads as a candid moment.
- Look toward the light or off into the distance — give your gaze a destination.
- Add a subtle squint so your eyes look like you're thinking, not spacing out.
- Great when you're self-conscious — you're not staring down the lens.
Photo: Pexels · free license
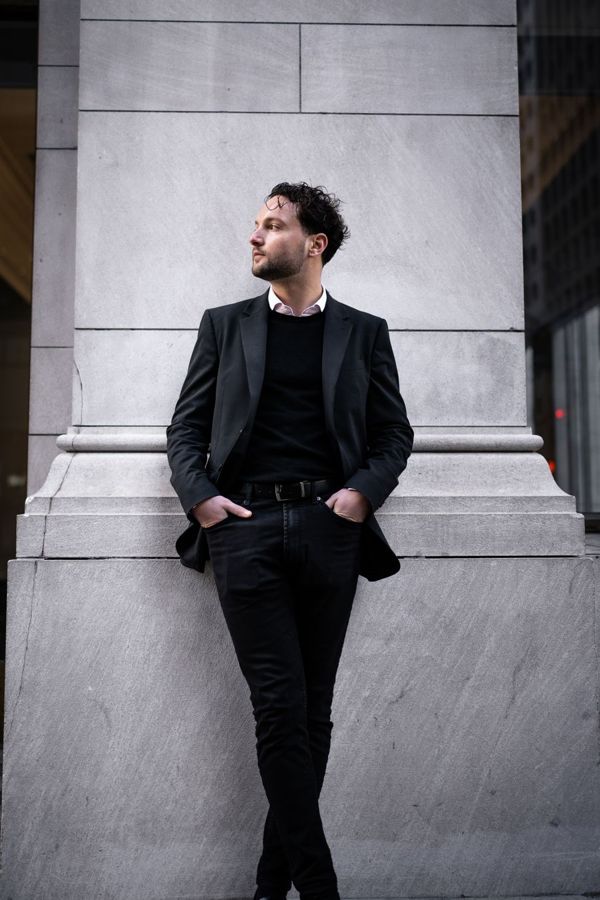
7 · DRESSED UP — BLAZER + POCKETS
Same hands-in-pockets confidence, sharpened for when you're in a jacket.
- Hands in your trouser pockets, thumbs out — it pushes the jacket open and shows a clean line.
- Standing: button only the top button. Sitting or leaning: unbutton it so it doesn't bunch.
- Angle the body, one shoulder to the camera — never both lapels flat-on.
Photo: Pexels · free license
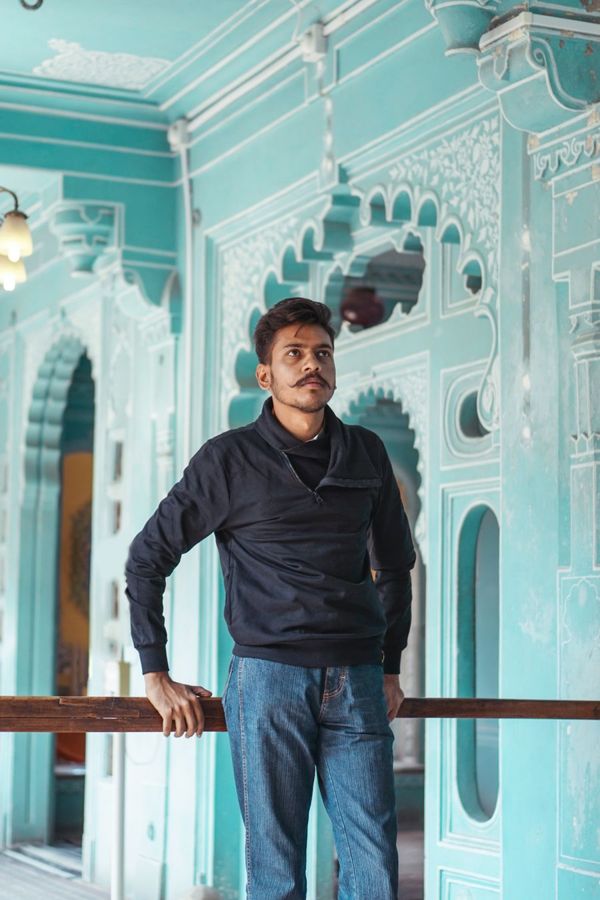
8 · REST A HAND / LEAN ON SOMETHING
The cure for "where do my hands go." Give them something to hold and the whole body relaxes.
- Rest a forearm or hand on a railing, ledge, chair back, or your own bent knee.
- Let it pull you into a slight lean — asymmetry looks more natural than standing to attention.
- Keep the resting hand soft, not gripping — tension shows in photos.
Photo: Pexels · free license
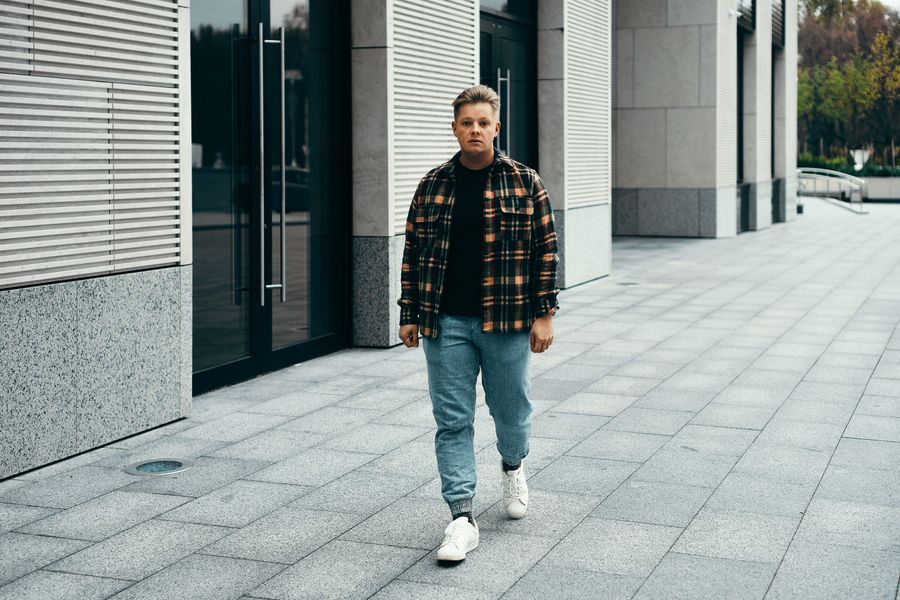
9 · FULL-BODY, STREET-STYLE
For the full outfit / "fit pic." How you look head-to-toe.
- Shoot from just below eye level (camera around chest height) — it makes your legs and height read longer.
- Keep one foot clearly ahead of the other; don't stand feet-together like a passport photo.
- X100VI: the 35mm-equivalent lens is flattering full-body — stand ~8–10 ft back so your proportions stay true.
Photo: Pexels · free license
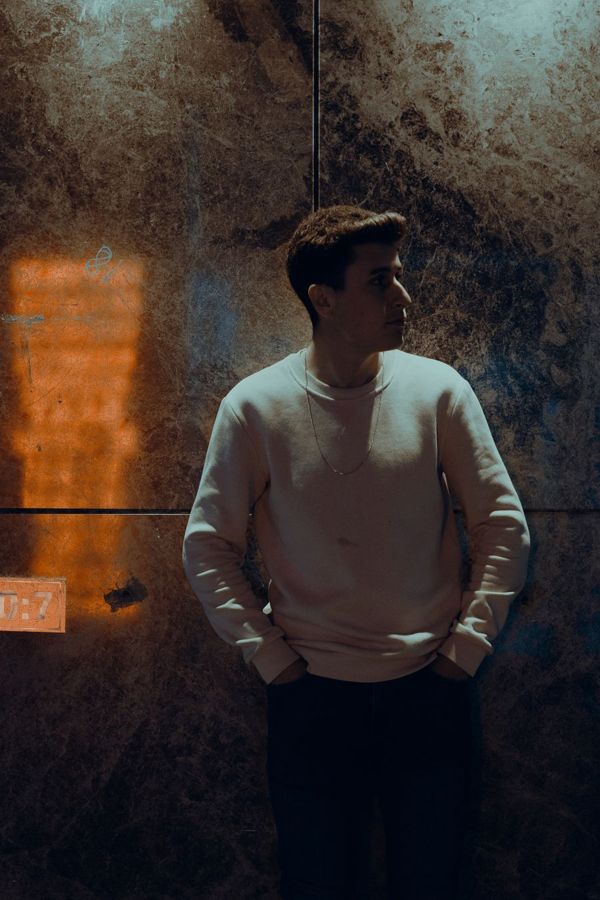
10 · MOODY LEAN (use side light)
Same relaxed lean, but let light do the work for a cinematic, magazine feel.
- Turn your face toward a window or side light and let the far side of your face fall into soft shadow.
- Small chin drop, relaxed hands, calm expression — this one is not a smile shot.
- X100VI: dial exposure comp down about −⅔ so the shadows stay rich instead of washing out.
Photo: Pexels · free license
Example photos via Pexels (free license) — free to use, no attribution required.
5 · Beginner settings that experts actually use
Based on published setup guides from working X100VI photographers (Roman Fox et al.), verified against the manual.
| Setting | Set it to | Why |
|---|---|---|
| Image quality | FINE + RAW | JPEGs get the pretty film simulation baked in; the RAW file is your safety net to re-edit later. Best of both while learning. |
| Auto-ISO (daytime) | base 125 · max 6400 · min shutter 1/200 | Roman Fox's daylight preset — freezes normal motion, camera floats ISO so you never think about it. |
| Auto-ISO (low light) | base 500 · max 6400 · min 1/100 | His evening preset — lets more light in before cranking ISO. |
| Auto-ISO (action) | base 1000 · max 12800 · min 1/500 | Fast shutter for moving subjects (festivals, kids, pets). |
| Focus mode | AF-S + Face/Eye Detection ON | AF/MF SETTING menu → FACE/EYE DETECTION. The camera finds faces for you. |
| AF area | Single Point (or Zone for movers) | Fujifilm's own guidance: Zone for erratically moving subjects; Wide/Tracking uses the whole frame. |
| Stabilization | ON (it's in-body, 5-axis) | Rated up to 6 stops — handheld night shots become possible. First X100 with IBIS. |
| ND filter | OFF (know where it is: Q menu) | The built-in 4-stop ND darkens everything for bright-day wide-aperture shots — and is the #1 "why are my photos dark?!" gotcha when left on. |
6 · Film simulations — all 20, visualized
Fujifilm's magic trick: color "looks" baked into your JPEGs, named after real films. The X100VI has 20 modes (14 named sims; Acros and Monochrome each add Yellow/Red/Green filter variants). Change them fast via the Q menu. Every preview below is one real street photo with an approximate grade of each look applied, so you can compare their character on the same scene — the camera's real output is subtler and better.
Drag the handle. Left = Provia (the default). Right = the selected simulation, graded onto the same street scene.
PROVIA / Standard
The default. Accurate, balanced color — "ideal for a wide range of subjects." Your everyday.
VELVIA / Vivid
Punchy saturated slide film. Landscapes, sunsets, greens & blues. Not kind to skin.
ASTIA / Soft
Gentle contrast, faithful skin — the go-to portrait sim.
CLASSIC CHROME
Muted, documentary-magazine color. Street, architecture, overcast days.
REALA ACE
The X100VI's new 20th sim — faithful color with punchy tone. Great all-rounder.
PRO Neg. Hi
Portrait film with a bit more contrast — Fujifilm's official portrait pick alongside Astia.
PRO Neg. Std
Softest, flattest color-negative look — studio portraits, editing headroom.
CLASSIC Neg.
Based on Superia drugstore film — nostalgic, cool-shifted. Urban/street favorite.
NOSTALGIC Neg.
Amber warmth like 1970s photo albums. Golden hour's best friend.
ETERNA / Cinema
Flat, understated cinema look — made for video.
ETERNA BLEACH BYPASS
Desaturated + high contrast — gritty, dramatic.
ACROS (+Ye/R/G)
Fine-grain rich B&W. Filters: Ye/R darken skies for drama, G helps skin.
MONOCHROME (+Ye/R/G)
Straight B&W, plainer than Acros.
SEPIA
Old-photograph brown. Occasional novelty.
7 · Which sim for which occasion
VERIFIED = recommendation verified from published photographer guides · SUGGESTED = our sensible pick where sources didn't single one out.
| Occasion | Use this | Backup | Why + tip |
|---|---|---|---|
| 🚶 Street / city walk | Classic Chrome VERIFIED | Classic Neg. | Muted documentary tones; Classic Neg. for a moodier nostalgic street look. Try the optical viewfinder here. |
| 🍜 Food / restaurants | Astia SUGGESTED | Provia · Reala Ace | Soft contrast keeps plates appetizing without Velvia's oversaturation. 45° angle, window light, exposure comp +⅓. |
| 🎪 Festivals / concerts / night events | Classic Neg. SUGGESTED | Provia · Eterna Bleach Bypass | Handles mixed neon/stage light with attitude; switch Auto-ISO to the action preset (min 1/500) for moving crowds. Bleach Bypass for gritty drama. |
| 🧑 Portraits / friends | Astia VERIFIED | Pro Neg. Hi | Both are Fujifilm's designated portrait sims — faithful, flattering skin. Face/Eye AF on. |
| 🏞 Landscapes / parks | Velvia VERIFIED | Provia | Vivid greens/blues pop. Keep it OFF people. |
| 🌇 Golden hour / sunsets | Nostalgic Neg. VERIFIED | Velvia (sunset color) | Amber 70s warmth amplifies golden light beautifully. |
| ☁️ Cloudy / rainy days | Classic Chrome VERIFIED | Acros | Muted look loves flat light; Acros turns gloom into mood. |
| 🍸 Indoor / dim bars | Provia SUGGESTED | Classic Neg. | Neutral base handles funky indoor white balance; low-light Auto-ISO preset (min 1/100), brace your elbows. |
| ✈️ Travel documentation | Provia VERIFIED | Reala Ace | Accurate memory-keeping default; Reala Ace when you want a touch more character. |
| 🎥 Video | Eterna VERIFIED | — | Flat cinematic tone made for footage (pairs with the AI Video Pipeline on the home page 😉). |
| ⬛ Black & white mood | Acros VERIFIED | +R filter for dark skies | Fine-grain, rich tonality — the classy B&W. |
8 · Film "recipes" — the free upgrade
A recipe is a saved combo of in-camera JPEG settings that makes your X100VI mimic classic films (Kodachrome, Portra…). Nothing to install — you just dial in settings once.
A recipe = a base film simulation plus these in-camera adjustments (all verified as real X100VI menu settings):
- Grain Effect — roughness Strong/Weak/Off, size Large/Small
- Color Chrome Effect and Color Chrome FX Blue — deeper tones in saturated colors/skies
- Dynamic Range — Auto / 100% / 200% / 400% (protects bright skies)
- Clarity — −5 to +5 (negative = dreamy film glow)
- White balance shift — the secret sauce; tiny red/blue nudges create the "film" cast (2500–10000K + fine shift)
The community bible is Fuji X Weekly (Ritchie Roesch) — hundreds of free recipes with exact settings, plus X100VI-specific packs. Beginner favorites to look up: Kodachrome 64 (vintage slide-film Americana) and the Portra-style recipes (soft, warm skin tones). There's also a free Fuji X Weekly app to browse them.
9 · Common first-week mistakes (quick fixes)
| Symptom | What happened | Fix |
|---|---|---|
| "All my photos are suddenly dark" | The built-in 4-stop ND filter got left ON | Q menu → ND Filter → OFF |
| "It won't focus at all" | Focus switch bumped to MF (it's on the left side, easy to knock) | Slide it back to AF-S |
| "Photos are blurry indoors" | Shutter dial got turned off A to something slow, or arm's-length hold | Dial back to A; tuck your elbows (section 3) |
| "Viewfinder looks weird / it's a window now" | You flicked the front lever into the optical viewfinder | Flick it again for EVF — or learn to love OVF for street |
| "Everything looks zoomed / cropped" | Digital teleconverter got enabled (rings/menus) | Menu → Digital Tele-Conv → OFF |
| "Exposure is always too bright/dark" | Exposure comp. dial bumped off 0 | Check the top-right dial is at ±0 |
| "Battery died mid-update / camera won't boot" | Firmware updated on a low battery | Prevention: only update at full charge. If bricked: Fujifilm service |
| "My shots don't look like the film sim" | Shooting RAW-only (sims bake into JPEGs) | Image quality → FINE+RAW |
🎬 Recording video (the basics)
The X100VI shoots gorgeous video too (up to 6.2K). Here's the beginner path — then the real manual pages.
- Switch to movie mode. Press the DRIVE button → choose Movie. The screen switches to a 16:9 video view.
- Press the shutter button to start / stop recording. A red frame + timer shows you're rolling.
- Leave it on Auto to start — aperture/shutter/ISO on A, focus AF-C for moving subjects. Film simulation still applies — try Eterna for a flat, cinematic look.
- Sound: the built-in mic records automatically; for better audio plug a mic into the 3.5 mm mic/remote connector.
- Watch it back: press PLAY → movies show a ▶ icon; press the center button to play.
🎥 Holding & moving — you are the gimbal
Photos forgive shaky hands; video shows every wobble. The fix isn't gear — it's how you hold the camera and how you move your body around it.
A · HOW TO HOLD (VIDEO GRIP)
Video grip ≠ photo grip. You're not bracing for one click — you're becoming a tripod for 10 seconds.
- Camera at chest, LCD tilted up, both hands on the body, elbows pressed hard into your ribs. Your torso does the stabilizing, not your wrists.
- Neck-strap trick: shorten the strap and push the camera forward until the strap pulls taut — hands + strap = three points of contact, an instant "poor man's gimbal."
- Breathe out slowly while rolling. Holding your breath makes you shake more. X100VI: IBIS ON; use the LCD, not the EVF, for any shot where you move.
B · PICK YOUR ANGLE (ONE PER CLIP)
All ten photo angles from section 4 work in video too — the rule is one angle per clip, not a tour of all of them in one shot.
- Eye level = people talking. Chest level = walking b-roll — it's steadier and instantly more cinematic than eye level.
- Low + tilted up for drama (crowds, buildings, festival stages); overhead for food, hands, unboxings.
- Change angle between clips, not during. Shoot the scene wide, then again from low, then a close detail — three separate 8-second clips edit together beautifully.
C · THE VIEW (FRAMING FOR 16:9)
The frame goes wide in movie mode, and moving subjects change the framing rules slightly.
- Headroom: put eyes on the top gridline — same rule of thirds as photos, just wider.
- Lead room: a person walking or looking sideways gets empty space in the direction they're moving, never behind them.
- Keep the horizon dead level — a tilt reads ten times worse in video than in a photo. And shoot 5–10 second clips, one idea each; short steady clips are what edits are made of.
D · MOVE YOUR BODY, NOT THE CAMERA
The camera stays glued to your chest — all movement comes from your knees and hips. That's the whole secret of gimbal-looking handheld footage.
- Ninja walk: bend your knees, shuffle heel-to-toe in small steps — your bent legs absorb the bounce like suspension.
- The 23mm lens doesn't zoom — your legs are the zoom. Get closer by slowly walking in, wider by walking back (glance behind you first).
- Pan from the hips, arms locked — never swivel your wrists. Orbit by side-stepping a slow circle around the subject at constant distance.
| Move | How (body, not hands) | Use it for |
|---|---|---|
| Static | Plant your feet, elbows in, don't move at all — let the subject move through the frame | 80% of good b-roll. The most underrated move there is |
| Push-in | Ninja-walk slowly straight toward the subject | Building tension, revealing a detail |
| Pull-back | Ninja-walk backward (check what's behind you first) | Reveals, endings, "leaving the scene" |
| Pan | Rotate slowly from the hips, arms locked to your torso | Following action, sweeping across a scene |
| Tilt | Start low, slowly tilt up (bend from the knees/back, not wrists) | Revealing height — street → skyscraper top |
| Orbit | Side-step a slow half-circle, keeping the same distance | Hero shots of a person, plate, or object |
| Track | Walk alongside a moving subject at exactly their speed | Walking conversations, street characters |
📖 Straight from the official manual (tap an image to open it full-size):


Full movie coverage: manual p.87–94 (recording, settings, playback) · movie menu options around p.205–232 (jump via the reader's chapter menu).
📸 See real X100VI photos (not renderings)
The film-sim previews above are CSS approximations. These are verified galleries of actual X100VI camera output — study them to learn what to shoot and how each sim really looks.
Best overall sample galleries
DPReview — X100VI sample galleries BEST QUALITY
Real out-of-camera JPEGs + downloadable RAW, with per-image shutter / aperture / ISO and named film sims — street, cafe/food, nightlife/low-light, Seattle → Yokohama.
Main sample gallery → · Review gallery (RAW + sims) → · Street: Seattle → Yokohama →
Every film simulation on the same scene
Fuji X Weekly — 20 sims compared BEST FOR SIM COMPARISON
One identical real scene rendered across all 20 film simulations, side by side — the true before/after of Classic Chrome vs Velvia vs Astia vs Classic Neg.
Recipes with real straight-out-of-camera samples
Fuji X Weekly — recipes shot on the X100VI BEST RECIPES
"Universal Negative" = 14 recipes created on the X100VI, every sample shot on that body (same base across sims for a direct look). Plus the full X-Trans V recipe index.
Universal Negative (14 X100VI recipes) → · All X-Trans V recipes →
More SOOC recipe libraries
film.recipes — 300+ recipes (X100VI-ready) → · Alex Armitage — 5 X100VI recipes, all unedited SOOC →
Real-world portfolios (what to actually shoot)
Working photographers' X100VI sets
Study framing, moments and light from pros shooting this exact camera.
Kevin Mullins — candid street/documentary → · Nathan Darma — Japan travel → · Roman Fox — setup + default recipe →
🎲 500+ shot ideas — never run out
Not sure what to shoot? Pick your situation and hit the dice — each idea comes with an angle, a film sim, and whether it's a photo or video. 515 ideas across 12 vibes; great when you're at an event, on a trip, or just wandering.
Tap 🎲 for an idea →
📖 The full official owner's manual
The complete official Fujifilm X100VI Owner's Manual — all 420 pages, rendered page-by-page below (every real diagram: the dials, every button, menu screens, the Q-menu callouts, flash, focus…). Use the arrows, type a page number, or jump by chapter. Prefer the file? Download the PDF. Or tap 🤖 Ask AI (bottom-right).
⬇ Download PDF (7.3 MB) ↗ Open full PDF

Source: fujifilm-dsc.com official X100VI manual (English), 420 pages. Tip: ← / → arrow keys flip pages when the reader is on screen.